Creating a basic Windows Driver in C
C Windows driver tutorial, creating a basic Windows Driver in C
What is a driver
A driver is a software component that runs in the kernel, an area of the operating system that exists below the normal version of the operating system you are used to, either as a end user, or as a developer.
A good analogy would be a modern car - most people use a car by sitting in it, pressing a button to switch it on, driving it with pedals and the steering wheel. Heck, you might not even have a gear stick these days! This can be what we consider ‘userland’, the area where every day things take place. Developers will also work in this ‘userland’, such as programming the radio, satnav, Apple CarPlay, lights, etc. This can be thought of as usermode development; in computing terms, this would be making Windows applications such as Spotify, web browsers, etc.
Using the analogy, the kernel would be the computer systems running the car - calculating whether you are about to hit the car in front of you, orchestrating the vehicle switching on by taking the input from the driver hitting the button, managing the engine, power inputs/outputs, handling energy surges, etc. In general, people other than the company who builds the car, or its hardware, will ever have cause to mess with the inner workings of the car. This is the kernel. The Windows kernel is built and maintained by Microsoft, however, third party developers may add capabilities near the kernel through drivers.
These drivers are often used to handle IO operations, such as your keyboard, USB drives, hard drives, network devices, etc. If you use a VPN for example, you will likely have a kernel driver for it, as it needs to intercept communications at the lowest levels to handle encryption / routing, you cannot do this without a driver component.
Getting started
I would recommend firstly using the KMDF (Kernel Mode Driver Framework) API; this is a modern abstraction around driver development, meant to make it somewhat easier to develop a driver. The other option, would be to use the WDM (Windows Driver Model), but from what I gather, this is considered legacy by the community. MSDN article on the difference.
To get started with driver development you need a few things:
- A Windows virtual machine (or an old spare computer, wouldn’t recommend this option)
- VisualStudio with:
- MSVC x64/86
- C++ development tools
- Windows 10 SDK
- Windows Driver Kit
I would recommend downloading those, as per the MSDN docs, as opposed to installing via the Enterprise WDK - in my experience this leads to a few headaches.
Configuring your VM
To run and test a driver, you should ideally deploy it to a VM or onto a test device (NOT your development device). A ‘blue screen of death’ is caused by a bug in a driver; so imagine locking yourself out of your PC because the driver you are developing blue screens… Don’t turn yourself into a CrowdStrike victim!
Once you have your Windows VM setup, you need to do the following in an elevated (admin) terminal:
(please please do not do these on your normal Windows computer, only in your VM, as it’s disabling some settings to allow you to test an unsigned driver)
- bcdedit -set TESTSIGNING ON
- bcdedit /debug ON
- bcdedit /dbgsettings serial debugport:1 baudrate:115200
Before you restart the VM, open the settings and create a new serial port, the serial port number should equal the debugport number in the above instructions. Your settings should match:
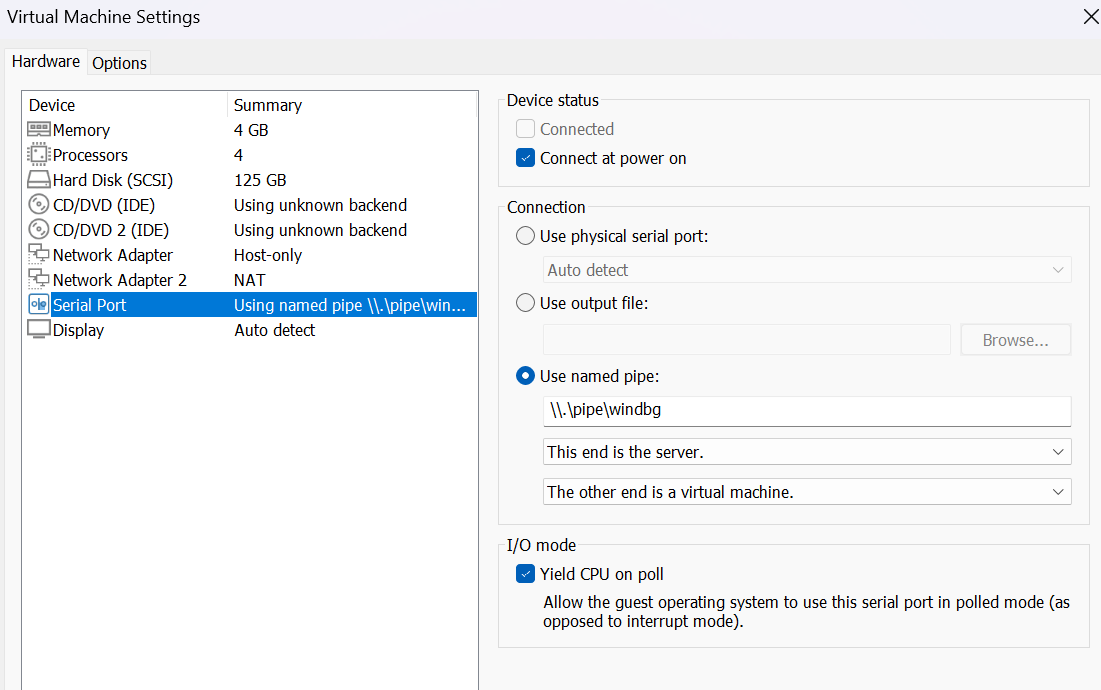
This serial port will be used from your host to communicate between the debugger (windbg) and the VM kernel. This will allow you to see DbgPrints (basically a printf for the kernel) but also interact with kernel memory.
You will also need to disable secure boot in your VM settings.
You should also download into your VM DebugView from SysInternals which will allow you to view DbgPrint messages from within the VM without requiring to attach WinDbg to the VM kernel from your host.
Creating a simple driver
Now for the fun stuff! Create a new Kernel Mode Driver (Empty) project in VisualStudio and for your starting boilerplate you can use:
#include <ntddk.h>
#include <wdf.h>

DRIVER_INITIALIZE DriverEntry;

/**
 * Initialise driver wide structures
 */
NTSTATUS DriverEntry(
    _In_ PDRIVER_OBJECT     DriverObject,
    _In_ PUNICODE_STRING    RegistryPath
) {

    NTSTATUS status = STATUS_SUCCESS;

    DbgPrint("[my_driver] Starting kernel driver...\n");

    // allocate driver configuration object
    WDF_DRIVER_CONFIG config;

    // service only driver so no device callback needed
    WDF_DRIVER_CONFIG_INIT(&config, WDF_NO_EVENT_CALLBACK);

    // tell the framework its a non-pnp driver (without this it wont unload)
    config.DriverInitFlags |= WdfDriverInitNonPnpDriver;

    // create the driver object
    status = WdfDriverCreate(DriverObject,
        RegistryPath,
        WDF_NO_OBJECT_ATTRIBUTES,
        &config,
        WDF_NO_HANDLE
    );

    if (status == STATUS_SUCCESS) {
        DbgPrint("[my_driver] Driver initialised successfully.\n");
    }
    else {
        DbgPrint("[my_driver] There was a problem initialising...\n");
    }

    return status;
}
DriverEntry - this is the entry function, similar to a call to main(), and is used to initialise the driver. It receives a pointer to a DRIVER_OBJECT, which represents the WDM driver object, and a pointer to a string which specifies the path to the drivers Parameters key in the registry.
Note that we specify WDF_NO_EVENT_CALLBACK into WDF_DRIVER_CONFIG_INIT; as we are not writing a PnP (plug and play) driver, we do not need / want a device based callback routine.
Deploying the driver
With the above code written, you can build it with ctrl+b in VisualStudio and it will build a .sys file!
If you haven’t rebooted your VM after making the updates found above, you’ll need to give it a reboot.
Start DebugView which you should have downloaded into your VM - this needs to be run as admin. Once open, in the menu bar -> Capture, ensure you tick Capture Kernel and Enable Verbose Kernel Output.
After this, copy over your .sys driver file to the test VM, and register a service with (in an elevated terminal):
sc.exe create my_driver binPath=C:\Users\User\Desktop\driver\driver.sys type=kernel
sc.exe start my_driver
If all went well, you should now see the DbgPrint messages.
Next steps
At this point, play about with WinDbg and attaching that to the VM’s kernel, this will allow you to interact with the driver / kernel memory.
TL;DR for setting this up:
- Run windbg as admin (should have downloaded when you installed VisualStudio, if not, grab it from Microsoft SysInternals)
- Go to File -> Attach to kernel
- Click on the COM tab
- Ensure Pipe and Reconnect are ticked
- Resets should be 0
- Baud Rate should be 115200
- Port should be: \.\pipe\windbg (remember this setting from the screenshot of how to set your VM up above?)
Once thats running, restart your VM and you should see WinDbg attach like so:
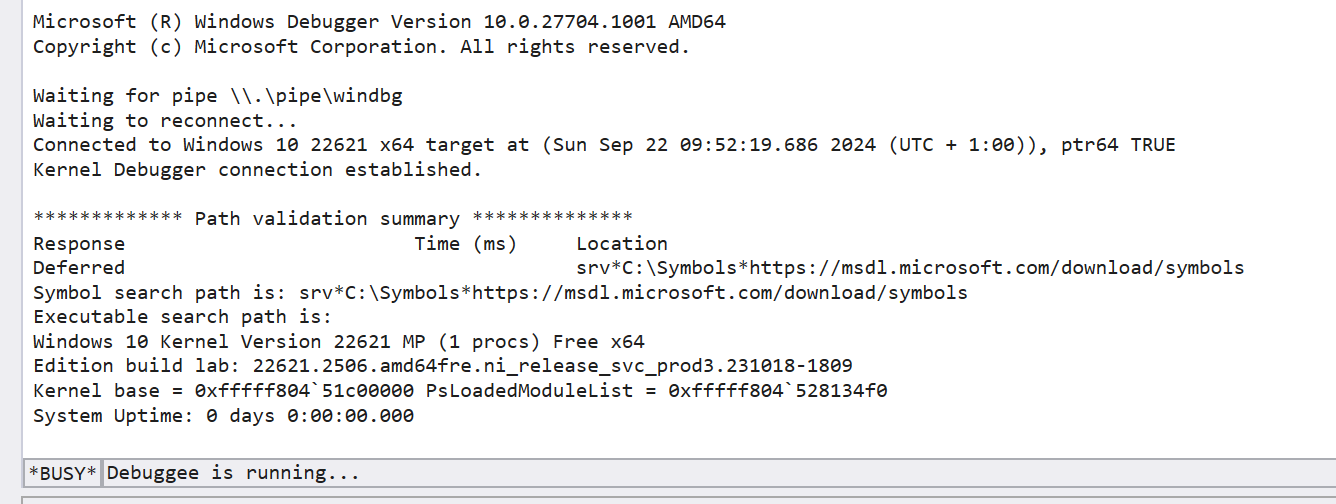
To use commands and interact, you need to ‘break’ the debugger, by clicking break in the top left. You can now interact with the memory :)

If you wish to see the print messages from WinDbg, be sure to break before starting the driver and typing into the console:
ed kd_default_mask 0xf
Then you can use !dbgprint in the debugger to see your prints.