Creating a framework in Wyrm C2 to easily configure custom exports of an implant
Macros, machine code, and mischief!
Intro
As of version 0.4.4 of Wyrm, you can now define custom exports on built DLL’s. Through the profile, you have two options:
- Create a custom export for launching the main Wyrm payload. Note that this will remove the default export of
run. You can specify as many of these as you wish. - Create a custom export, with accompanying machine code. This would mostly be useful as an anti-analysis tactic, or to run some custom shellcode (such as starting a loader for something).
In this blog post we will look at the details of implementing this functionality! You can read the docs for Wyrm to get started!
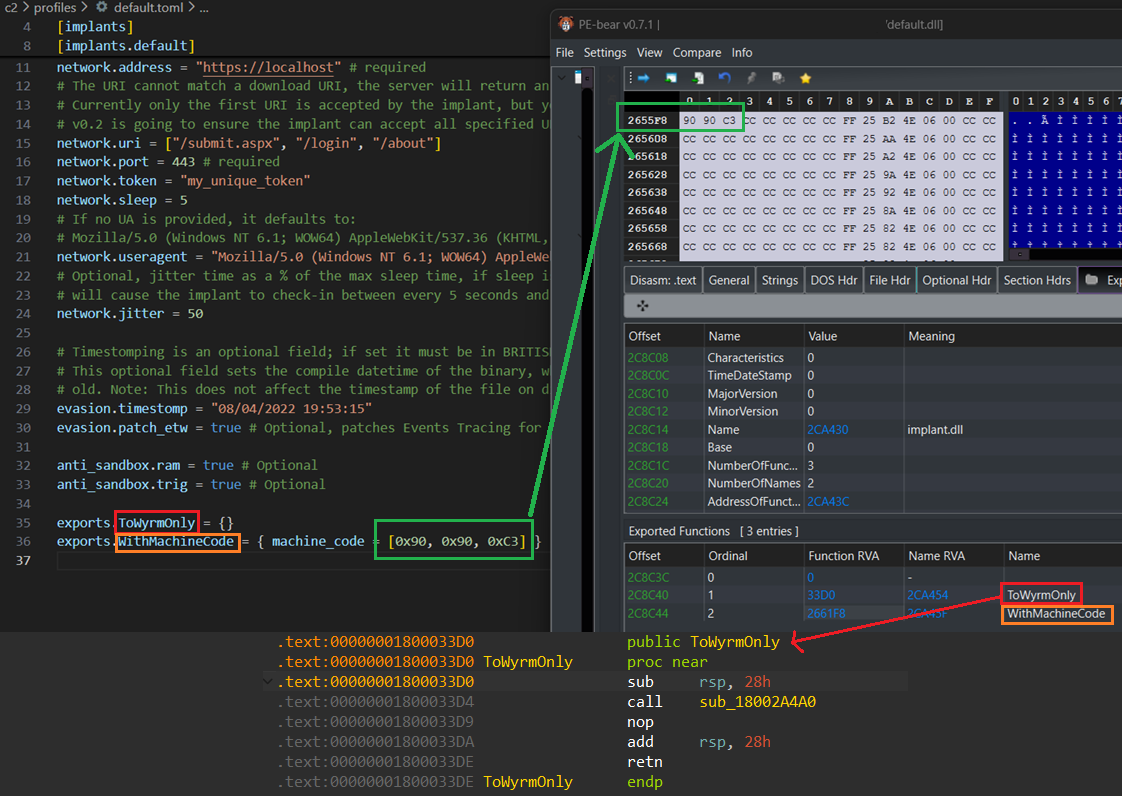
This image here shows the result of doing this, explained below.
What are exports
DLLs are essentially executables, just without the main entry function. They are mostly (almost exclusively) used to provide programs with additional functionality and capabilities from code that was not provided in the main binary. An example, albeit poor, is if you wrote a math function which adds two numbers - lets say you didn’t want to have to repeat this code in all your programs, you could export that code as a DLL and import it into programs you wish to have add numbers together.
This exported function in a DLL is referred to as an export, and exists in the DLL’s export table. You can view DLL exports with tools like dumpbin, disassemblers, or PE Bear.
Wyrm builds executables, but also DLL’s, which opens much more slippery techniques such as DLL Sideloading.
If you want more info on how DLL Sideloading works, check my post here. I will be bringing automated sideloading features to Wyrm in a future update.
Implementation
So, how can we approach this? Well, we need this to take place at compile time so it is baked into the binary, and we need all linking etc to occur correctly. Well; as I prefer Rust over C / C++, this is incredibly simple!
Macros! Macros in Rust is essentially code which writes code, commonly referred to as metaprogramming. If you are new to Rust,
you have likely used a macro the first time you coded it - println!() is a macro (denoted by the bang !).
So, we can define some macros to take in some arguments, call them, which will then compile that macro into the binary! That is pretty neat!
Implementing the wyrm entry export
Starting with the one which will be easier to implement - we want to write a macro which defines a public export on the DLL, which calls the main entrypoint for the Wyrm agent. All the macro needs as an input is the function name, which we can then write verbatim, ensuring we add the relevant attributes to make it compile to exports.
We can do this as follows (remember, a macro is just code which writes code):
macro_rules! build_dll_export_by_name_start_wyrm {
    ($name:ident) => {
        #[unsafe(no_mangle)]
        pub extern "system" fn $name() {
            start_wyrm();
        }
    };
}
So, we take an arg of name, which we use to write to the function name, and the rest is familiar to us - we ensure we have the
[unsafe(no_mangle)] so that the export name doesn’t get mangled by the compiler (turned to junk).
By convention, when we write a DLL we declare it as:
#[unsafe(no_mangle)]
pub extern "system" fn SomeExport() {
    // library code here
}
Easy!
Implementing custom machine code
Next we need to think about how we want to implement this to use custom machine code. Thankfully, Rust has the naked_assembly macro - which allows us to write raw assembly (better for this use case than the normal assembly macro). To quote the Rust blog:
What makes naked functions special — and gives them their name — is that the handwritten assembly block defines the entire function body. Unlike non-naked functions, the compiler does not add any special handling for arguments or return values.
With naked assembly, we can insert machine code instructions (as well as actual assembly syntax). We do this by prepending .byte.
So, to build on the above macro we wrote, we need to include the operators custom machine code bytes in the form of ‘0xQQ,’. We can do this with the nice stringify macro, writing the incoming bytes as a string, and concatenating with the .byte directive.
Building a framework around the implementation
Well, this is cool to call by hand for your exports, but as I am building an open source red team framework, this should be easy to use for operators.
So, first we need to add new fields on the profile, to accept a BTreeMap where the
key is the export name, and the value is an inner type which holds the metadata such as the machine code. This could also allow us to
expand it in the future to accept other metadata, I’m thinking along the lines of ordinals required for more complex Sideloading.
After doing that, we need a way to pass the config to the implant when it is being built. This is fairly straightforward thanks to Rust’s build script system, we can include the function below which will accept the settings from environment variables (set by the C2 at implant build time):
fn write_exports_to_build_dir() {
    let out_dir = PathBuf::from(env::var("OUT_DIR").unwrap());
    let dest = out_dir.join("custom_exports.rs");
    let mut code = String::new();

    let exports_usr_machine_code = option_env!("EXPORTS_USR_MACHINE_CODE");
    let exports_jmp_wyrm = option_env!("EXPORTS_JMP_WYRM");

    if let Some(export_str) = exports_jmp_wyrm {
        if export_str.is_empty() {
            // If there was no custom export defined, then we just export the 'run' extern
            write!(&mut code, "build_dll_export_by_name_start_wyrm!(run);\n",).unwrap();
        }

        for fn_name in export_str.split(';').filter(|s| !s.trim().is_empty()) {
            write!(
                &mut code,
                "build_dll_export_by_name_start_wyrm!({fn_name});\n",
            )
            .unwrap();
        }
    } else {
        // Just in case.. we still need an entrypoint, tho this should never run
        write!(&mut code, "build_dll_export_by_name_start_wyrm!(run);\n",).unwrap();
    }

    if let Some(export_str) = exports_usr_machine_code {
        for item in export_str.split(';').filter(|s| !s.trim().is_empty()) {
            let mut parts = item.split('=');
            let name = parts.next().unwrap().trim();
            let bytes = parts.next().unwrap_or("").trim();

            if name.is_empty() && bytes.is_empty() {
                panic!("Error parsing export: {name}");
            }

            write!(
                &mut code,
                "build_dll_export_by_name_junk_machine_code!({name}, {bytes});\n",
                name = name,
                bytes = bytes,
            )
            .unwrap();
        }
    }

    // We still need to write in the case of nothing so that we dont get include
    // errors
    fs::write(dest, code).unwrap();
}
Now, we have custom_exports.rs in the build directory. Finally, we need to join the dots by including this in the
implant source code with the include macro which literally places the code from
file passed as an argument into where it is being called from:
include!(concat!(env!("OUT_DIR"), "/custom_exports.rs"));
And with that - you can define custom exports through profiles!
Conclusion
Returning to the image:
Here you can see in the profile we define two exports, ToWyrmOnly which should call the entrypoint of the Wyrm implant, and a second which
is WithMachineCode, which contains 2 nop’s and a ret.
You can see in PE-Bear, the two exports in the exports table (minus run which was removed because we defined a custom Wyrm export). You can
then see us in the top panel at the address of the WithMachineCode function, where you can see the machine code we specified in the
profile.
At the bottom of the screenshot you can see the disassembly of the ToWyrmOnly function, which makes a call to the Wyrm entrypoint.
All working as expected!
Red Team operators using the Wyrm C2 can easily configure custom exports at compile time, opening the door to advanced sideloading and anti-analysis techniques. Future updates will expand metadata support for more complex scenarios as well as helping automate parsing machine code.
Finally, on reflection - if you are skilled enough to do the machine code option, given this is an open source project, you are probably better off just modifying the implant source code to include some exports of your choosing. Though, the advantage this method brings (more so the standalone export / DLL Sideloading) is you can build multiple profiles & variations of the agent through the profile.toml which would limit you less than modifying the source code and copying that over to the C2. So there is still advantage in this, perhaps more on the side of Auto-Sideloading without forcing the implant code to be that statically (thanks to the malleable profiles).